
Easy No-Bake Oreo Chocolate Pie: A Slice of Heaven Made Simple
Hey there, friend! Alex here, and I’m so excited to share one of my absolute favorite no-bake desserts with you: this incredibly easy Oreo Chocolate Pie. If you’re like me, you love a good chocolate fix, but sometimes the thought of turning on the oven just feels like too much. That’s where this recipe comes in! This pie is rich, decadent, and requires absolutely no baking. It’s the perfect treat for a hot summer day, a last-minute party, or just when you need a little something sweet to brighten your day. This isn’t just any chocolate pie; it’s a symphony of textures and flavors that will have everyone asking for seconds. When you taste it, you will know this is the chocolate pie for you.
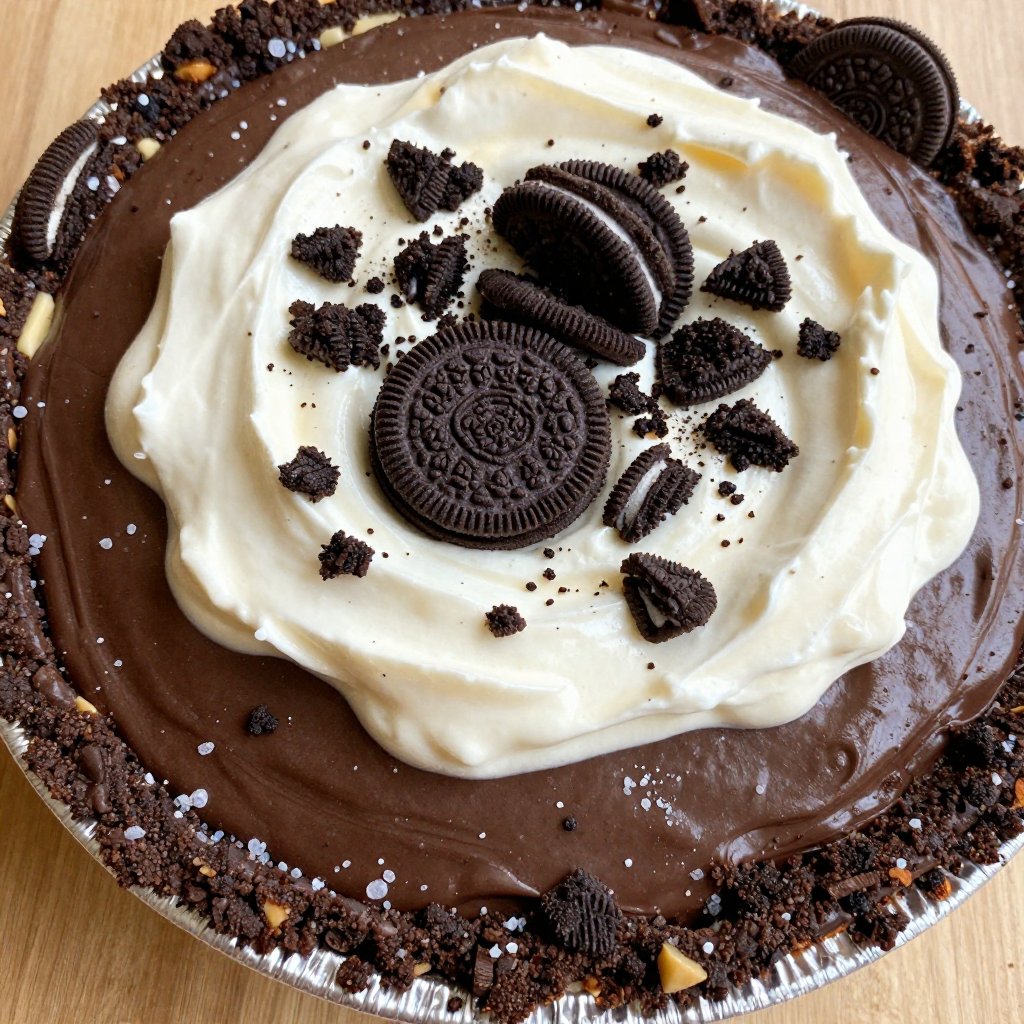
Think of it as a hug in pie form. The Oreo crust provides a delightful crunch, the dark chocolate filling is smooth and creamy, and the whipped topping adds a light and airy finish. It’s a combination that’s simply irresistible. And the best part? It’s so easy to make that even a beginner baker can whip it up with confidence. You’re going to love how simple, yet satisfying, this pie truly is.
Why You’ll Love This No-Bake Oreo Chocolate Pie
This Oreo Chocolate Pie isn’t just easy; it’s also incredibly delicious. Here’s why it’s going to become a staple in your dessert rotation:
- No-Bake Simplicity: Forget about preheating the oven and worrying about baking times. This recipe requires no baking at all, making it perfect for hot weather or when you’re short on time.
- Rich Chocolate Flavor: The instant dark chocolate pudding mix creates a deeply satisfying chocolate flavor that’s both decadent and comforting.
- Perfectly Balanced Textures: The combination of the crunchy Oreo crust, the creamy chocolate filling, and the light whipped topping creates a delightful textural experience.
- Crowd-Pleasing: This pie is always a hit with kids and adults alike. It’s perfect for parties, potlucks, or any occasion where you want to impress your guests.
- Customizable: Feel free to get creative with the toppings! Add chocolate shavings, sprinkles, or even a drizzle of chocolate sauce for an extra touch of indulgence.
You’re going to love how this pie comes together so quickly and easily, and how much everyone enjoys it. It’s the kind of dessert that makes you feel good from the inside out.
Ingredients You’ll Need
Here’s what you’ll need to make this delightful no-bake Oreo Chocolate Pie:
- 24 whole Oreo Cookies (approx. 265g): These form the base of our delicious crust.
- 4 Tbsp (56g) unsalted butter, melted: This helps bind the Oreo crumbs together to create a sturdy crust.
- 1/4 tsp sea salt: Enhances the sweetness of the crust and balances the flavors.
- 1 package (3.9 oz / 110g) instant dark chocolate pudding mix: This is the key to our rich and creamy chocolate filling.
- 1.5 cups (355ml) cold 2% milk: Helps the pudding mix set properly and creates a smooth consistency.
- 1/2 cup (120g) plain non-fat Greek yogurt: Adds a tangy twist to the filling and makes it extra creamy.
- 1 tsp pure vanilla extract: Enhances the chocolate flavor and adds a touch of warmth.
- 2 cups (475ml) light whipped topping, thawed: Provides a light and airy finish to the pie.
- 4 Oreo cookies, coarsely crushed: These are for garnishing the pie and adding extra Oreo goodness.
Let’s Make This Pie: Step-by-Step Instructions
Now for the fun part! Here’s how to assemble your very own No-Bake Oreo Chocolate Pie:
- Prepare the Oreo Crust: Pulse 24 whole cookies in a food processor until they resemble fine grounds. Drizzle in melted butter and salt, pulsing until the mixture reaches a wet sand consistency.
- Press the Crust into the Pie Plate: Press the mixture firmly into the bottom and up the sides of a 9-inch pie plate using the bottom of a flat measuring cup. Make sure the crust is evenly distributed and tightly packed.
- Make the Chocolate Filling: In a large mixing bowl, whisk together the instant dark chocolate pudding mix, cold 2% milk, Greek yogurt, and vanilla extract until thickened and aerated. This should only take a few minutes.
- Assemble the Pie: Pour the chocolate filling into the prepared crust and spread evenly with an offset spatula. Smooth out the top for a neat presentation.
- Add the Whipped Topping: Spread the light whipped topping over the filling and garnish with 4 coarsely crushed Oreos. Get creative with your garnishing!
- Chill and Set: Refrigerate the pie for at least 2 hours to allow the starch gelatinization to set the structure before slicing. This step is crucial for ensuring the pie holds its shape.
And that’s it! Your No-Bake Oreo Chocolate Pie is ready to be enjoyed. It’s just the best!
Pro Tips for the Perfect Pie
Here are a few extra tips to help you create the perfect No-Bake Oreo Chocolate Pie:
- Use a Food Processor: A food processor makes quick work of crushing the Oreos for the crust. If you don’t have one, you can place the cookies in a resealable bag and crush them with a rolling pin.
- Press the Crust Firmly: A well-packed crust is essential for preventing it from crumbling. Use the bottom of a measuring cup or a spoon to press the Oreo mixture firmly into the pie plate.
- Don’t Overmix the Filling: Whisk the pudding mix, milk, Greek yogurt, and vanilla extract just until combined. Overmixing can result in a rubbery texture.
- Chill Thoroughly: Allow the pie to chill for at least 2 hours, or preferably longer, to ensure the filling is fully set. This will make it easier to slice and serve.
- Garnish Creatively: Get creative with your toppings! Add chocolate shavings, sprinkles, or a drizzle of chocolate sauce for an extra touch of indulgence.
Common Mistakes to Avoid
Even though this recipe is simple, here are a few common mistakes to watch out for:
- Not Pressing the Crust Firmly Enough: A loose crust will crumble when you try to slice the pie. Take your time and press the Oreo mixture firmly into the pie plate.
- Using Warm Milk: Cold milk is essential for helping the pudding mix set properly. Make sure your milk is chilled before using it.
- Overmixing the Filling: Overmixing can result in a rubbery texture. Whisk the ingredients just until combined.
- Not Chilling the Pie Long Enough: If you don’t chill the pie for at least 2 hours, the filling won’t be fully set, and it will be difficult to slice.
If you avoid these common mistakes, you’re sure to end up with a perfect No-Bake Oreo Chocolate Pie every time!
Delicious Variations to Try
Want to mix things up a bit? Here are a few delicious variations to try:
- Peanut Butter Oreo Pie: Add a layer of peanut butter to the bottom of the crust before adding the chocolate filling.
- Mint Chocolate Oreo Pie: Use mint-flavored Oreos for the crust and add a few drops of peppermint extract to the chocolate filling.
- White Chocolate Oreo Pie: Use white chocolate pudding mix instead of dark chocolate pudding mix for a sweeter twist.
- Double Chocolate Oreo Pie: Add chocolate shavings or a drizzle of chocolate sauce to the top of the pie for an extra dose of chocolatey goodness.
- Coffee Infused: Add a teaspoon of instant coffee granules to the pudding mixture for a mocha flavor.
Feel free to experiment with different flavors and toppings to create your own unique version of this classic pie!
How to Store Your Oreo Chocolate Pie
To store your No-Bake Oreo Chocolate Pie, cover it tightly with plastic wrap or place it in an airtight container. Store it in the refrigerator for up to 3-4 days. The pie may soften slightly over time, but it will still be delicious. Don’t freeze the pie, as the whipped topping will not thaw well.
Frequently Asked Questions (FAQ)
- Can I use regular chocolate pudding mix instead of dark chocolate? Yes, you can! The flavor will be slightly different, but it will still be delicious.
- Can I use a different type of cookie for the crust? Absolutely! Graham crackers, chocolate wafers, or even shortbread cookies would work well.
- Can I make this pie ahead of time? Yes, you can make this pie up to 2 days in advance. Just store it in the refrigerator until you’re ready to serve it.
- Can I freeze this pie? I don’t recommend freezing this pie because the whipped topping doesn’t freeze and thaw well.
- Is it okay to use low-fat milk? While 2% milk is recommended for the best consistency, you can use low-fat milk if you prefer. The filling might be slightly less creamy.
Serving Suggestions
This No-Bake Oreo Chocolate Pie is delicious on its own, but here are a few serving suggestions to take it to the next level:
- Serve it chilled: This pie is best served cold, straight from the refrigerator.
- Add a scoop of ice cream: A scoop of vanilla or chocolate ice cream is the perfect complement to this pie.
- Drizzle with chocolate sauce: A drizzle of chocolate sauce adds an extra touch of indulgence.
- Garnish with fresh berries: Fresh raspberries or strawberries add a pop of color and a burst of flavor.
- Pair it with coffee or milk: This pie is the perfect accompaniment to a cup of coffee or a glass of cold milk.
No matter how you choose to serve it, this No-Bake Oreo Chocolate Pie is sure to be a hit! I hope you enjoy making and eating this pie as much as I do. It’s a simple, comforting dessert that’s perfect for any occasion. Enjoy!
If you like this recipe, you might also enjoy my gf-choc-cake and my gluten-free-chocolate-cake recipes!

Easy Oreo Chocolate Pie No-Bake
Ingredients
Method
- Pulse 24 cookies in a food processor. Drizzle in melted butter and salt, pulsing until wet sand consistency.
- Press the mixture firmly into a 9-inch pie plate.
- Whisk together pudding mix, milk, Greek yogurt, and vanilla until thickened.
- Pour the chocolate filling into the crust and spread evenly.
- Spread whipped topping over filling and garnish with crushed Oreos.
- Refrigerate for at least 2 hours before slicing.